目次
11.日本語ファイルを登録する
日本語ファイル(PDFやxlsx、pptxなど)をElasticSearch(AWSマネージドサービス)に登録する際に苦労したのでメモ
前提
ElasticSearchのバージョン及びプラグイン
ElasticSearchのバージョンは7.10を利用しています、バージョンごとのプラグインは公式を参照
インストールされているプラグインは以下のコマンドで確認可能です。(ingest-attachmentとanalysis-kuromoji入っています。)
curl -X GET -H 'Content-type: application/json' '{Elasticsearchエンドポイント}/_cat/plugins?v'
ElasticSearchへのdocument(データ)登録方法
以下の2パターンで試しました。
・Bulk API
・Logstash
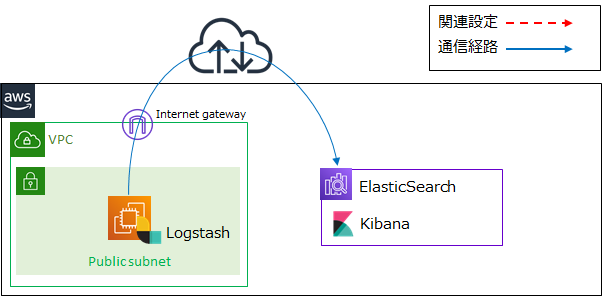
構成図
操作は以下の構成/ルートで実施しています。
Template、Pipeline
TemplateとPipelineは下記を参考に設定願います。
Aws/ElasticSearch/3.Template
Aws/ElasticSearch/4.Pipeline
Bulk API
パイプラインの作成
Bulk APIでdocument(データ)をElasticSearchに登録する際は、目的のデータを[data]として渡します。
パラメータはElasticSearch公式を参照
#パイプラインの設定
curl -X PUT -H 'Content-type: application/json' '{Elasticsearchエンドポイント}/_ingest/pipeline/{pipeline名}?pretty' -d'
{
  "description" : "Extract attachment information",
  "processors" : [
    {
      "attachment" : {
        "field" : "data",
        "indexed_chars" : -1,
        "properties" : [
         "content",
         "content_type"
        ]
      }
    }
  ]
}
'

#パイプラインの確認
curl -X GET -H 'Content-type: application/json' '{Elasticsearchエンドポイント}/_ingest/pipeline?pretty
投入データの加工、登録
・[data]で渡すファイルは、Base64でエンコードして渡します。
・こちらのページを参考に、AWS公式の登録方法でAPIを実行しています。
・AWSのElasticSearchでは[_type]は[_doc]です。
#投入データの加工、登録ファイルの作成
file_path='{投入データのパス}'
file=$(base64 $file_path | perl -pe 's/\n//g')
echo -e "{ \"index\" : { \"_index\" : \"{インデックス名}\", \"_type\" : \"_doc\", \"_id\" : \"{ID}\", \"pipeline\": \"{pipeline名}\" }\n{ \"@timestamp\" : \"`date +'%Y-%m-%dT%H:%M:%S.%NZ'`\", \"data\" : \"$file\" }" > input.json

#加工したファイルからdocument(データ)登録
curl -X POST -H 'Content-Type: application/json' '{Elasticsearchエンドポイント}/_bulk?pretty' --data-binary @input.json
Logstash
パイプラインの作成
Logstashでdocument(データ)をElasticSearchに登録する際は、目的のデータを[message]として渡します。
パラメータはElasticSearch公式を参照
#パイプラインの設定
curl -X PUT -H 'Content-type: application/json' '{Elasticsearchエンドポイント}/_ingest/pipeline/{pipeline名}?pretty' -d'
{
  "description" : "Extract attachment information",
  "processors" : [
    {
      "attachment" : {
        "field" : "message",
        "indexed_chars" : -1,
        "properties" : [
         "content",
         "content_type"
        ]
      }
    }
  ]
}
'

#パイプラインの確認
curl -X GET -H 'Content-type: application/json' '{Elasticsearchエンドポイント}/_ingest/pipeline?pretty
投入データの加工、登録
・[message]で渡すファイルは、Base64でエンコードして渡します。
・こちらのページと、AWS公式を参考にしています。
・Logstash設定ファイルの中で{投入データのパス}を定義できますが、今回はコマンドで渡しています。
※base64でエンコードして[perl -pe 's/\n//g']で改行を削除していますが、変換したデータの末尾に改行が必要なようなので[grep ^]をつけています。
#Logstash設定ファイルの作成
vi logstash.conf

input {
stdin {}
}
output {
  elasticsearch {
    hosts => ["{Elasticsearchエンドポイント}:443"]
    ssl => true
    index => "{インデックス名}"
    pipeline => "{pipeline名}"
    ilm_enabled => false             #Amazon ESのバージョン7以降を利用する場合は、記載しないとエラーになるらしい
  }
}

#ファイルからdocument(データ)登録
base64 {投入データのパス} | perl -pe 's/\n//g' | grep ^ | /usr/share/logstash/bin/logstash -f logstash.conf

#テキストからdocument(データ)登録(テスト用)
echo "{テキスト}" | base64 | perl -pe 's/\n//g' | grep ^ | /usr/share/logstash/bin/logstash -f logstash.conf